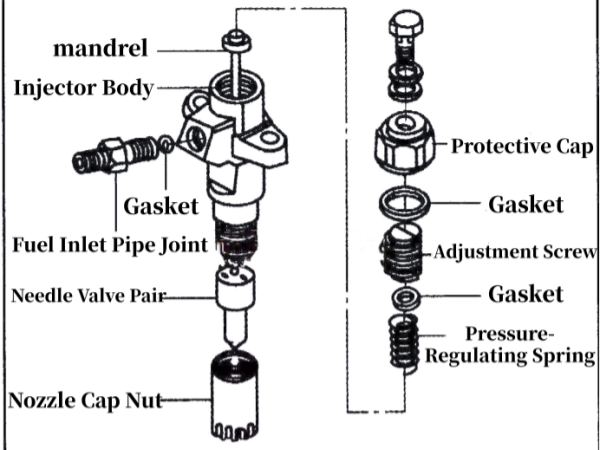
The basic steps for disassembling the
fuel injector are shown in the above figure
(1) Firstly, loosen the joint nut of the high-pressure oil pipe and remove the high-pressure oil pipe and its fixing clip.
(2) Next, remove the return oil pipe.
(3) Remove the fixing nut of the fuel injector, and then use a special tool to remove the fuel injector assembly.
(4) Fix the removed fuel injector onto the vise and use a wrench to remove the protective cap.
(5) Next, use a flathead screwdriver to unscrew the adjustment screw.
(6) During this process, it is also necessary to remove the gasket, pressure regulating spring, and core shaft.
(7) Ensure that the nozzle of the fuel injector is facing upwards and use a socket wrench to remove the cap nut of the nozzle.
(8) Finally, remove the needle valve assembly and the disassembly work is completed.
2. Reinstallation of fuel injectors
(1) Firstly, carefully install the needle valve assembly and ensure that the positioning pin on the valve body is accurately aligned with the positioning hole on the injector body.
(2) Next, tighten the cap nut of the nozzle to the specified torque to maintain stability.
(3) Subsequently, install the core shaft and pressure regulating spring in sequence to ensure their correct positions.
(4) Use a flathead screwdriver to slowly screw in the adjustment screw, paying attention to controlling the force.
(5) Install washers and protective caps to protect the internal structure of the fuel injector.
(6) Carefully reinstall the reinstalled fuel injector onto the cylinder head and tighten the fixing nut of the injector to the specified torque.
(7) Finally, install the high-pressure fuel pipe and its clamp, as well as the return pipe of the fuel injector. Thus, the installation of the fuel injector is complete.


 English
 Русский
 Español